Categorias
Canabrava’s 4 Flanged

Foldable 4 Flanged Illustrations – Step by Step

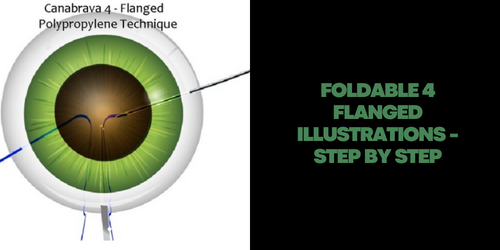
CANABRAVA 4-Flanged Polypropylene Technique – @jcrsjournal STEP BY STEP PAPER:

A microforceps passing through the corneal incision to place a 6-0 polypropylene filament in the bore of the 29-gauge needle (1A). The alignment of the suture through the 4 closed eyelets IOL holes and positioning of the sclerotomies (1B). The monofilament of the fourth point fixation is outside of the corneal incision (1C). The needle is used to externalize the monofilament from the fourth scleral fixation point (1D). First make the lower 1st and 2nd flanges and then the IOL is adjusted by pulling the monofilament (1E). The final position of the IOL and the flanges (1F). All 4 flanges need to be inside the sclera to avoid endophthalmitis!

Attention: read all paper about my double flangeds polypropylene techniques on Pubmed to avoid complications!!

Categorias
Canabrava’s 4 Flanged

Non-Foldable 4 Flanged Video

1. 7 mm Scleral tunnel
2. Single Piece PMMA IOL with eyelets
3. 26G needle
4. Prolene 5.0 Ethicon
5. IOL in the SULCUS. It is important to avoid tilt
6. Flanges inside the sclera to avoid inflamation and endofthalmits!

Categorias
Canabrava’s 4 Flanged

Non Foldalbe 4 Flanged with Bioniko Models

Check out the first instruccional video for the BIONIKO CANABRAVA KIT, showing you how to safely train for non- foldable IOL fixation in a simulated environment.
Remember: See One, Simulate One, Do one, Teach one.
@bioniko.models

Categorias
Canabrava’s 4 Flanged

Foldable 4 Flanged Technique – Steps

It’s unacceptable in this internet era that we live in, doctors trying to publish other people’s work as their own. It’s been almost one year that I’ve been publishing results about the 4 flanged technique + the Canabrava Suture. Yesterday, my good friend @lukanmishev , from Bulgaria, brought to my attention that this one doctor published one video last week claiming the technique as his own. I’m trying to convince myself that this doctor has not seen my presentation at the ASCRS – San Diego, ESCRS – Paris, AAO – San Francisco, or any other video on AAO. It’s hard to believe, but, you never know… It’s an honor to me, having my technique being replicated around the world, but it’s important that the credit is given properly

Categorias
Phacoemulsification Principles

Medial Canthus (Caruncle) Periocular Anesthesia

This technique is commonly used as an adjunct to Peribulbar anesthesia when the primary anesthesia lost the effects.

A 26-gauge, short bevel needle is inserted in the semilunaris fold, between the globe and the lacrimal caruncula.The needle is then shifted slightly medially, displacing the caruncula medially away from the globe until a “click” is perceived. Then, the globe came back to the primary gaze position. This movement possibly corresponds to the passage through the “medial check” ligament. I like to use maximum 1,5 ml lidocaine + 1,5 ml bupivacaine.

Categorias
Phacoemulsification Principles

Carousel Technique

CAUROSEL TECHNIQUE FOR SOFT NUCLEUS “Patient with bag desinsertion.. these hooks is not a iris hooks, it is a Mackool Hooks to support the bag.

TIPS:
1. Hydroprolapse the nucleus
2. Chopper behind the nucleus
3. Start in the periphery
PARAMETERS

Vac: 280 – 320
Asp: 28 – 32
Us: 35 – 50 (burst mode)

Categorias
Phacoemulsification Principles

Subincisional Cortex Management

Tips for beginners! Last cortex!

Categorias
Phacoemulsification Principles

Removing OVD in Toric IOLs

CANABRAVA RING
– Toric IOL
– Aspirate Visco behind the IOL
– Removing the ring

Categorias
Phacoemulsification Principles

Hydroprolapse / Tilt and Tumble Technique

You can use this Maneuver in Soft Nucleus!

Categorias
Phacoemulsification Principles

Phaco Chop Technique Video 2

The phaco tip is buried in the center of the nucleus with high vaccum. Then, the 1.5mm chopper is inserted through the side-port and placed opposite the main incision at the edge of the nucleus. The chopper is positioned under the lower edge of the capsulorhexis and pulled toward the phaco tip. The two instruments are then moved in opposite directions to divide the nucleus into halves. This process is continued and the chopper is used to break the nucleus in smaller fragments.